

How To Install A Battery Shut Off Switch
A boat battery shut off switch is an fantabulous item to use when you desire to safeguard your boat. When it comes to emergencies, the marine bombardment on off switch will be of smashing help.
Knowing how to install a battery disconnect switch on a boat makes every boating trip safe and worthwhile. This prevents starting or continuing to operate the gunkhole unintentionally. You can do this marine battery disconnect switch installation apace and easily.
In this article, you'll larn:
- Things to fix for the installation of marine battery disconnect switches
- How to exercise a boat bombardment switch installation
Table of Contents
- Tools Yous'll Need for the Installation
- 1. Battery Switch
- 2. Phillips Screwdriver and Screws
- 3. Socket Wrench
- 4. Silicone Caulking
- five. Drill Bits and Drill
- half dozen. Safety Insulating Gloves
- Hither are the Seven Steps to Follow on Installing the Battery Kill Switch to Your Boat
- Pace i: Buy A Battery Kill Switch
- Step 2: Disconnect Both Battery Wires On The Boat's Bombardment
- Step 3: Remove The Battery Ground And Solenoid Connection
- Pace iv: Connect The Kill Switch Wires
- Footstep v: Reconnect The Battery Terminals
- Step 6: Decide the location of the impale switch
- Footstep seven: Connect the Kill Switch to the Frame
- Step 8: Connect the Bombardment Cables
- Decision
Tools You'll Need for the Installation
ane. Battery Switch
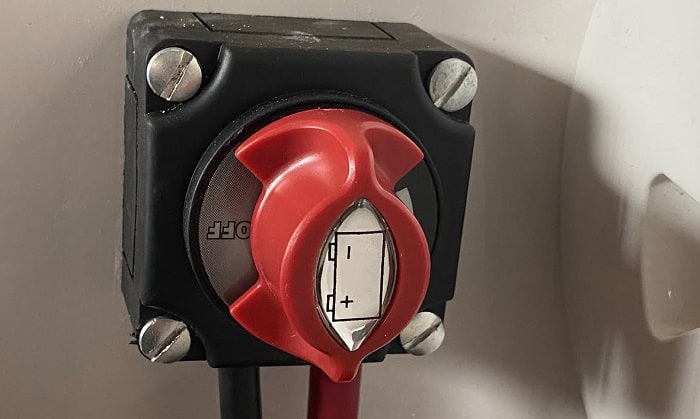
A dual circuit plus battery switch is installed (OFF-ON-COMBINE) to divide a motor battery from the boat's housing banking concern. Check that the engine'due south battery is linked to the starter when switching ON.
Ensure the battery has housing loads continued to the housing battery bank. Likewise, disconnect switches for batteries are heavy-duty devices. Purchase only the correct goods and check the following:
- The switch amperage should exist greater than the battery ampere.
- The usual battery voltage is 12 Volts minimum for boats.
- Terminals made of brass or stainless steel piece of work well.
- Switches having an IP65 rating can resist astringent weather condition conditions.
2. Phillips Screwdriver and Screws
These screwdrivers are designed to suit Phillips head screws that feature a cross-shaped recess, thus the term cantankerous screwdriver. They were created to deal with increased torsion.
Meanwhile, Phillips screw heads provide for a tighter fit than flat head screws. That is why nearly manufacturers and handymen employ this tool. The screw's size is commonly tiny and lite. The cardinal is to utilize a screwdriver that is compatible with the kind and screw size you are using.
3. Socket Wrench
A socket wrench'south job is to loosen or tighten connectors like basics and bolts, without having to reposition the tool only on the fastener. This is necessary when turning a wrench in a complete circle isn't possible. It may help shorten the process of tightening battery and terminal fasteners.
Socket wrenches also have a long pole to which several size sockets may be connected to tighten various size bolts. As a upshot, it'south of import to select the correct socket size for the specific fastener.
4. Silicone Caulking
Caulk or is a substance used to seal gaps or seams in different constructions and pipes confronting leaking. The gel-like fabric will exist pushed into the gaps shaped like wedges between the surface of your boat and the screws attached to put the switch in place.
You can apply the tip of your finger when smearing the caulk around the screwed areas. Ensure there are no gaps where water can come in. Also, you can try putting a dab before you lot spiral the switch on the surface, and then squeezing in between when tightening the screws.
five. Drill $.25 and Drill
Drill $.25 are used to make holes in a number of dissimilar materials, including boats' surfaces. This tool will be used to bore holes that match the sizes of the switch'south spiral holes. It will as well aid hands screw the kill switch in identify, securing it from moving around.
Ensure buying the appropriate sizes. If it'due south likewise big, the drilled hole will exist too loose for the screw to hold the switch to the gunkhole's surface. But if information technology's besides small, it volition exist too tight for the screws to dig and may cause rougher edges, which, in plow, can scrape the wirings of the switch or appeal less on the gunkhole.
6. Condom Insulating Gloves
Safety insulating gloves while dealing with bombardment cables and terminals may exist the most essential slice of protection to wear. Electric safety gloves must have dielectric characteristics, physical force, flexibility, and durability to be effective.
This is because lead-acid batteries incorporate explosive hydrogen-oxygen fumes and sulfuric acid, which may inflict serious burns. When working or treatment a lead-acid bombardment, take these measures to prevent risk and harm. When in that location'south electric leakages equally you piece of work with the battery and disconnect switch.
Hither are the Seven Steps to Follow on Installing the Battery Kill Switch to Your Boat
Step 1: Buy A Battery Kill Switch
When installing the battery switch, the kind of switch you buy must be carefully considered. Await in the owner'due south handbook for information well-nigh the boat's battery and other components' power output. This should be matched upwardly with the battery kill switch and so you won't encounter a few problems.
In instance yous accept lost the bombardment's manual or handbook, don't hesitate to enquire for communication from the right people. Because having the right bombardment kill switch ensures that information technology matches the voltage menses capacity of your switch. Moreover, going over what is recommended means you lot'll unnecessarily spend additional money.
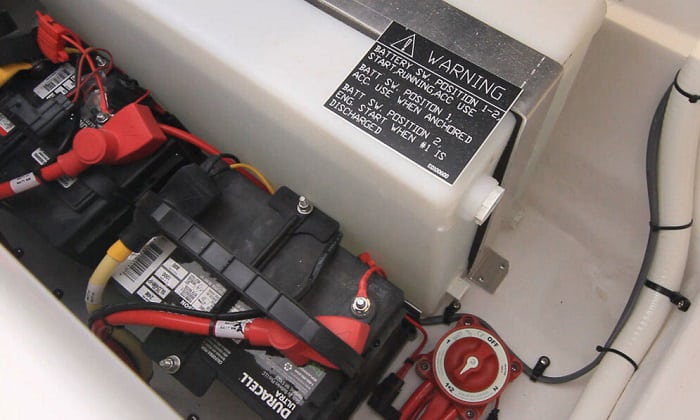
Step 2: Disconnect Both Battery Wires On The Boat's Bombardment
When working on electrical components, you should ever split both the negative and positive wires from the battery rods to guarantee your safety. Cleaning the connections, wires, and connecting points while the cables are disconnected from the battery rods is a good idea.
Besides, don't forget to take photos or sketch anything so you know bombardment orientation and what wires get back where. This will ensure that you volition reconnect the wires on the right connectors, especially if this is your offset time. Plus, you don't take to rummage in your brain later about what goes where.
Step 3: Remove The Battery Ground And Solenoid Connection
Your bombardment's negative terminal is connected to the body of the boat. It acts as the current'due south render route. That is why you must disconnect the cablevision that connects the batteries to the boat's body. While installing the switch, it may avert whatsoever unintentional short circuits.
If you lot don't have an originally installed switch, you'll need to apply the battery switch for the bypass of the boat starter's connection. Disconnect the connector between both the starting and the battery solenoid showtime.
Step 4: Connect The Kill Switch Wires
Y'all may now gear up upward the switch subsequently removing the terminal. Connect it to a cable likewise equally the bombardment concluding using wire. And then, the length between your switch and the primary battery should be measured. Cutting a cablevision the same length every bit the outset.
Too, it's simpler to handle your wires if you put the batteries together. Cutting a portion of another wire again from the switch disconnector to the solenoid starter. Keep in heed that the bombardment connection may be rated higher than the other electrical cables.
Step v: Reconnect The Battery Terminals
Reconnect the positive connection to the battery terminal. Ensure that information technology is securely fastened without damaging any ane of the wires. For reconnecting the positive wires, presume you lot're working with a three-terminal switch. Connect each battery'due south positive terminals to the switch's two inlets. It'southward an of import step because no battery cables should be connected to the switch'south output concluding.
Later that, connect the solenoid to the switch output terminal. To avoid any chances of accidents caused by sudden electric menstruum, make sure that the switch is now turned off. Then, connect each battery's negative terminals to the ground pin or the gunkhole's torso.
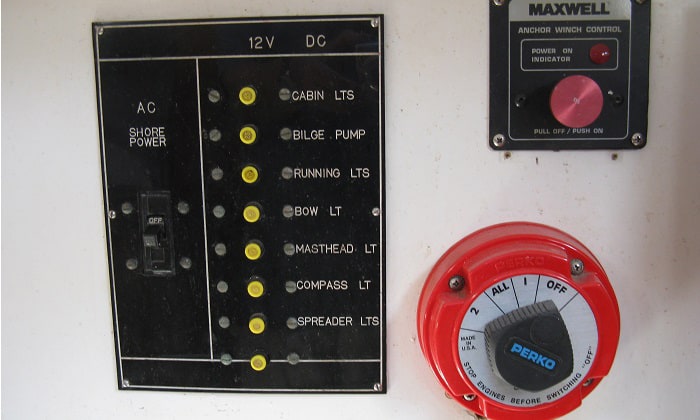
Footstep 6: Determine the location of the kill switch
To avoid electric leakages, the switch should be placed closer to your batteries. Above all, it should exist in a convenient position for the boat user. By making information technology and then, the kill switch is hands found in example of emergencies without causing you any panic tendency.
Too, when the switch is near the battery, you tin can use less cablevision. This saves you coin, time, and endeavour from doing complex power switches.
Step vii: Connect the Kill Switch to the Frame
Mark the position of the spiral holes in the battery switch housing using a marker. Drill holes and ensure that any extrusions that remain are removed. Line upward the battery switch holes with the slots you drilled and fasten with the provided screws.
Utilise a smear of the silicone caulk to the wire connections to serve every bit a waterproofing agent and forbid the wire connections from corroding and falling out.
Step eight: Connect the Battery Cables
You lot may at present reconnect the battery terminals to the battery poles once the battery disconnect switch has been fitted. And so, do some testing to see if information technology works by turning on your boat's engine then turning the impale switch. If the boat's engine shuts down as expected, it works perfectly fine. Otherwise, you need to turn off the kill switch and check the connectedness of the cables.
Decision
Knowing how to install a bombardment disconnect switch on a boat is essential to the success of your boating trips. Use these tiny devices to install and improve the rubber and security of your boat. You may cull between cardinal and lever operating switches, depending on your preference. Whatever your option, don't exit your boat without this vital safety device for ease and prophylactic.

Source: https://www.boatingbasicsonline.com/install-a-battery-disconnect-switch/
Posted by: potterwizance.blogspot.com
0 Response to "How To Install A Battery Shut Off Switch"
Post a Comment